Just wanted to share a simple crochet stitch pattern for the mesh / net stitch. If you like an open or lacy look, this stich is perfect. It's great for mesh bags, beach cover ups, summer tops and shawls. Below is the written pattern and if you prefer a video tutorial, there's also a link for the step by step instructions. Thanks so much for visiting!
Required Crochet Stitches and Terms:
chain (ch)
single crochet (sc)
skip (sk
Note: All terms are U.S.
Pattern Instructions:
Ch a multiple of 4
Row 1: Sc into the 8th chain from the hook, ch 5, sk 3 chains, sc into the next chain. Continue this way across the rest of the row until you reach the end. Place one sc in the last chain. Ch 5 and turn.
Row 2:
1 sc into the first chain 5 space from the previous row. Ch 5, place 1 sc into the next ch 5 space. Continue this way across until you reach the last ch 5 space, then place 1 sc. Ch 5 and turn. Repeat row 2.
I'm back with another easy pattern and video tutorial. This time we have a super easy crochet granny stitch triangle shawl. The granny stitch is so verstile, and not exclusive to the granny square - although the granny square deserves all the love it gets! After the first few rows, it's so easy to get the hang of this pattern and it's very relaxing, but addictive at the same time! Below is the written pattern and if you prefer a video tutorial, there's also a link for the step by step instructions. Thanks so much for visiting!
Supplies Needed:
Caron Blossom Cakes by Yarnspirations - medium weight yarn (4): 2 balls, or any medium weight yarn of your choice (600 yards / 595 m approx.) 5.0 mm crochet hook Scissors Tapestry Needle to weave in ends
Required Crochet Stitches and Terms:
chain (ch)
double crochet (DC)
slip stitch (sl)
skip (sk)
Note: All terms are U.S.
Sizing and Gauge
The finished shawl measures 56" wide approx. and 27" from centre bottom to top tip/peak approx.
Gauge: 6 groups of dc measuring from the bottom centre up is 4" approx.
4 groups of dc measuring along a short side = 4 inches approx.
The total number of rows on the shawl is 34, plus 1 row of sc border.
The size of the shawl is totally adujustable by the number of rows you do and completely up to you.
Pattern Instructions:
Ch 4, join with Sl st to form circle
Row 1: Ch 4 - (counts as dc plus 1), 3 dc in circle, Ch 2- corner made. 3 dc in circle, Ch 1, 1 dc into circle.
Row 2:
Ch 4 turn, 3 dc into first ch 1 space (from previous row), Ch 1. Into ch 2 space (peak), work 3 dc, ch 2, 3 dc. Ch 1, 3 dc into ch space, Ch 1, 1 dc.
Rows 3 - 34: Work row 2 or until desired size. Do not fasten off if you wish to do a sc border.
Border:
Ch 1, 3 sc in each space along longest side of triangle. First corner- Sc 3, ch 1.
Sc in each st. and into each ch 1 space along 2nd side to peak. 2sc, 2ch, 2sc in peak. Continue to start, end with 3sc , slip to ch1.
Crochet and especially vintage crochet designs and colours seem to be all the rage these days. Whether it be the traditional granny square blanket, or some variation, being worn by celebrities as a shawl, just granny square designs for the home. Anything from blankets to pillows, hot pads, clothing, accessories, the list goes on. Many examples can be found in pop culture and featured in our favourite movies and tv shows. For many of us long time crocheters, this trend is nothing new, but it seems the world has finally caught up!
So when it comes to blankets, aside from the traditional granny square blanket, nothing feels more vintage to me than a Chevron or ripple blanket, especially when its done in a granny stitch. I've done up a pattern that uses some slightly throwback colours and combined it with the granny ripple. Of course, you could you any colourway you desire, or simply make it in one colour. Also, the stripes could be any height or combination of your choice. The pattern and tutorial below is simply a basic guideline or framework. I will list all the materials and the amount of yarn I used so you can switch things up if you choose.
As always, thanks for stopping by and hope you enjoy making this blanket as much as I did!
Supplies Needed:
Loops N Threads - Soft Classic medium weight yarn: 2 balls each of Sage, Off White and Taupe or approximately yards or any medium weight yarn of your choice (700 yards / 640 m per colour approx.)
6.5 mm crochet hook - for starting Ch
6.0 mm crochet hook - for main blanket
Scissors
Tapestry Needle to weave in ends
Required Crochet Stitches and Terms:
chain (ch)
half double crochet (HDC)
double crochet (DC)
slip stitch (sl)
skip (sk)
Note: All terms are U.S.
Sizing and Gauge - How to Adjust Blanket Size:
The blanket measures 51" x 55" approx.
The multiple for this blanket is a ch of 18. If you wish to adjust the width of the blanket, add or decrease by 18 chains.
Gauge: A grouping of 2 peaks and 2 valleys = 9" approx.
4.5 rows = 4 inches approx.
The total number of rows on the blanket is 58 (not including the border). If you wish to make is smaller or larger, simply decrease or add to the number of rows. There is no need to follow the colour and striping design of this blanket - you do you!
Colour Key:
Colour A - Sage
Colour B - Off White
Colour C - Taupe
Pattern Instructions:
With Colour A and larger hook, Ch 162 (9 repeats of 18)
Row 1: (Colour A) - switch to 6.0 mm hook
3 DC in 5th ch from hook, sk next 2 ch, 3 dc in next ch, sk next 2 ch, *(3 DC, ch 3, 3 dc) in next ch (peak), (sk next 2 ch, 3 DC in next ch) twice**, sk next 5 ch, (valley), (3 DC in next ch, sk next 2 ch) twice, repeat from * across, ending last repeat at **, 1 DC in last ch, turn.
Row 2:
Ch 4, (3 DC between next two 3dc clusters) twice, *(3 DC, ch 3, 3 dc) in next ch 3 space (peak), (3 dc between the next two 3dc clusters) twice **, sk space between the next two 3dc clusters (ikvalley), (3 dc between next 2 groups) twice, repeat across, ending last repeat at **, sk next 3 dc, 1 dc in top of turning ch, turn.
Rows 3 & 4: Repeat row 2. Join with Colour B
Rows 5 & 6: Repeat Row 2. Join with C
Rows 7, 8, 9, 10: Repeat Row 2. Join with A
Rows 11 & 12: Repeat Row 2. Join with B
Rows 13, 14, 15, 16: Repeat Row 2. Join with C
Rows 17 & 18: Repeat Row 2. Join with A
Rows 19, 20, 21, 22: Repeat Rows 2. Join with B
Rows 23 & 24: Repeat Row 2. Join with C
Rows 25, 26, 27, 28: Repeat Row 2. Join with A
Rows 29 & 30: Repeat Row 2. Join with B
Rows 31, 32, 33, 34: Repeat Row 2. Join with C
Rows 35 & 36: Repeat Row 2. Join with A
Rows 37, 38, 39, 40: Repeat Row 2. Join with B
Rows 41 & 42: Repeat Row 2. Join with C
Rows 43, 44, 45, 46: Repeat Row 2. Join with A
Rows 47 & 48: Repeat Row 2. Join with B
Rows 49, 50, 51, 52: Repeat Row 2. Join with C
Rows 53 & 54: Repeat Row 2. Join with A
Rows 55, 56, 57, 58: Repeat Row 2. Fasten off.
Border:
With colour B, ch 2 and turn
Hdc in each stich across the top until you reach the ch 3 space. Place 2 hdc, ch, 2 hdc into the ch 3 space. Continue until the end of the row.
To start the first side of the blanket, place 3 hdc into the first ch space. Continue evenly down the side with hdc's. When you reach the last dc (nearing the bottom if the blanket), place 2 hdc, ch, 2 hdc in the ch space.
Working along the bottom of the blanket, start with 1 hdc in the bottom of the first cluster, then 3 hdc in the next ch space. Work this way until the first peak, then place 3 hdc, ch3, 3 hdc into the peak ch space. Continue this way across the bottom the blanket until the third corner. Here place 2 hdc, ch 2, 2 hdc in the corner ch space.
Work the final side the same as the other side until you reach beginning ch 2. Slip st into the top of ch 2.
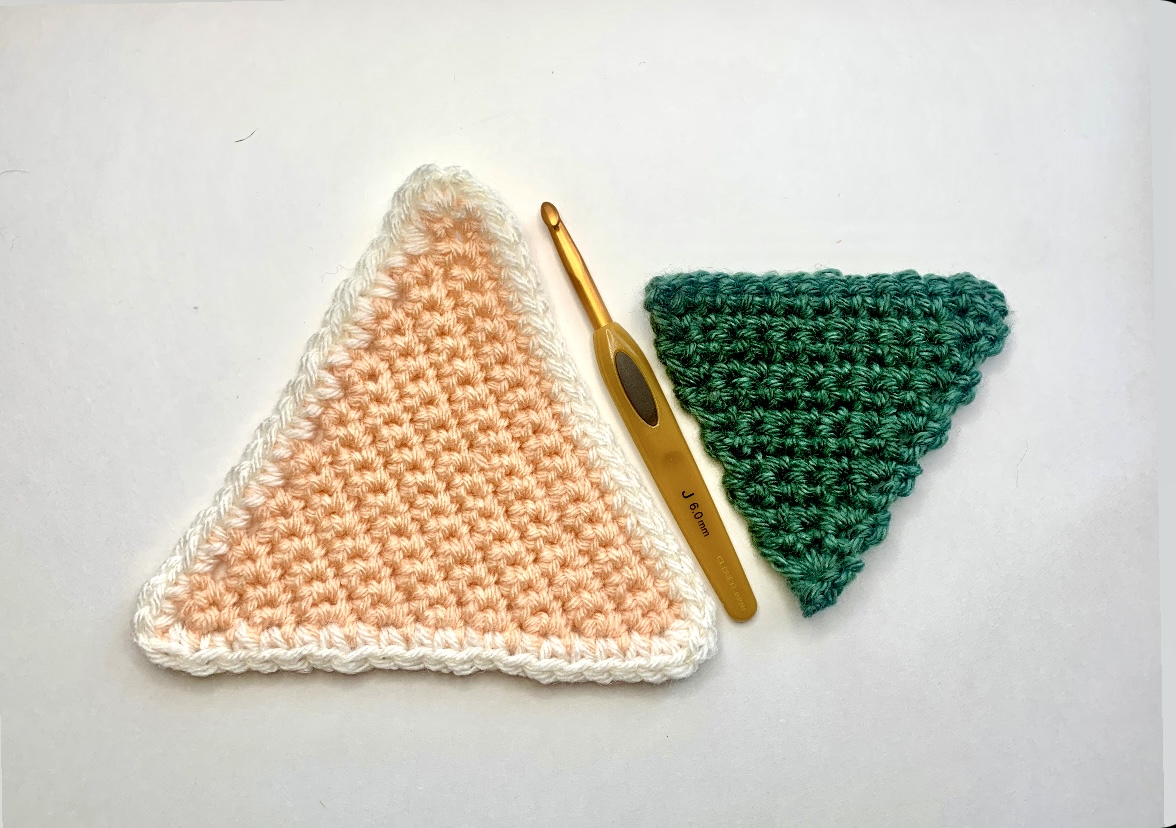
Just a quick pattern post / tutorial on how to crochet a triangle. Crochet triangles can be used in a variety of ways, especially in home decor. Crochet flags, or bunting, have been quite popular for some time now, and can be strung up along a mantle for decoration. Triangles are also great for making a patchwork blanket or pillow covering. For clothing or accessories, triangles are good for hair bandanas or kerchiefs, and even shawls.
There are many different ways to crochet a triangle. Below is a simple and beginner friendly triangle using only the single crochet stitch. Please enjoy the free written pattern and/or video tutorial below!
Supplies Needed:
Any yarn and corresponding hook size will work for this project
Scissors
Tapestry Needle to weave in ends
Required Crochet Stitches:
chain (ch)
Note: All terms are U.S.
Pattern Instructions:
Ch 2
Row 1: 1 sc into the second ch from the hook.
Row 2: Ch 1, 3 sc into next sc. (3 sts.)
Row 3: Ch 1, sc in each sc to end (3 sts.)
Row 4: Ch 1, 2 sc in first sc, sc to last sc, 2 sc in last sc. (5 sts.)
Repeat Rows 3 and 4 until desired triangle size. Fasten off and weave in ends.
Adding a sc border in contrasting colour is optional.
Thanks for stopping by! I recently made the most chunky and squishy crochet blanket for a friend. The stitch pattern is super easy and great for beginners. It's a 1 row repeat and works up very fast - it's great for working on while watching your favourite movie or tv series! So, if you're looking for the most cozy, cuddly and squishy blanket, look no further. Please enjoy the FREE written pattern, with instructions on how to adjust the blanket size. Or, if you prefer a tutorial, please enjoy step by step instructions available in the video link below. As always, enjoy!
Supplies Needed:
5 balls of - Bernat Blanket Yarn - Gray Storm Varg (for main body of blanket): 1,100 yards approx.
1 ball of Bernat Blanket Yarn - Coal (for border and fringe): 100 yards approx.
10.0 mm crochet hook
Scissors
Tapestry Needle
Required Crochet Stitches:
chain (ch)
slip stitch (sl st)
single crochet (sc)
half double crochet (hdc)
double crochet (dc)
Note: All terms are U.S.
Measurements / Sizing:
Finished blanket measures approximately 46" x 58" (excludes fringe)
Adjusting the Blanket Size:
The multiple for this blanket is 2 + 3. Chain an even number of chains to desired width and add 3 more chains. Work to desired length.
Pattern Instructions:
Ch 79 (76 + 3),
Row 1: sc in 3rd ch from hook, *skip 1 ch, then 2 sc into next ch, repeat from * to the last 2 ch, skip 1 ch and sc into last ch, then turn (you should have 76 sts).
Row 2: ch 1 (this will be your 1st sc), then 1 sc in first sc (last sc of previous row) * skip 1 sc, then 2 sc into next sc, repeat from * to last 2 sts, skip 1 sc, then 1 sc in top of turning ch, then turn (76 sts).
Repeat row 2 until your blanket measures approx. 55" (or desired length)
Border:
Join border colour to last stitch at the end of the final row. Fasten off main colour, Ch 1 and turn.
HDC in each stitch across. In last stitch at the end of the row, place 1 HDC, 1 dc, 1 HDC to make the first corner.
Work down the first side to the blanket evenly with HDCs. In the next corner work 1 HDC, 1 dc, 1 HDC.
Continue in the same way all the way around to the starting corner. Work last corner and slip st to first HDC. Fasten off.
Knotted Fringe:(See video tutorial)
Cut several 21” strips of yarn for the fringe.
Fold one strip of yarn in half and attach to bottom left corner with hook. Yarn over and pull through. With 2 folded strands, add fringe evenly across to corner (approx. every third stitch). In corner, add only one strip of yarn for fringe.
Working from left corner to right, knot the corner 2 fringe strands with 2 strands from the group of 4 to the right. Essentially you are knotting the 2 strands closest to each other from each tassel (side by side).
Continue all the way across.
Trim edge of tassels evenly across. Repeat on other end of blanket. Weave in ends.
Thanks for stopping by! It seems a bit early to be thinking about holiday decorations - we haven’t even reached Halloween yet. But, if you’re like me and you like to make a few ornaments each year, it’s never to early to start. Having said that, these star ornaments can easily be whipped up at the very last minute!
Not only is this project is very quick, it’s beginner friendly and it requires very little yarn. So, it’s perfect for using up some leftover yarn. For mine, I stuck with red, with a contrasting tie in off white, but I think it would be fun to work these up in other colours. Whatever you have on hand would work!
Check out the full pattern details below, or for video instruction click on video link above.
Supplies Needed:
Medium Weight Yarn - Bernat Super Value used here
5.0 mm crochet hook
Scissors
Tapestry Needle
Beads - optional
Required Crochet Stitches:
chain (ch)
slip stitch (sl st)
single crochet (sc)
double crochet (dc)
Note: All terms are U.S.
Measurements / Sizing:
Finished star measures approximately 2.5" across (not including tie)
Pattern Instructions:
Ch 4, join with a sl st to first ch to form a ring.
Round 1: Ch 1. *Work 1 sc into ring, ch 2*. Repeat from * 4 times. Join with a sl st to first st.
Round 2: Work *(1 sc, 1 dc, ch 2, 1 dc, 1 sc) into ch 2 space. Sl st into next st*. Repeat from * around 4 more times.
Fasten off and weave in ends.
Finishing:
Cut a piece of yarn in contrasting colour (or same) of about 18". Fold piece in half and attach to one point of star with hook. Yarn over and pull through. Thread both loose strands of yarn through tapestry needle and attach beads. Tie a knot at the top of the beads to secure. Tie ends together to form a loop for hanging, trim ends.
As the weather is beginning to turn, it's never too early to start with the fall and harvest decorating. Pumpkins are a fall staple and these crochet pumpkins fit the bill! They are super easy to make and beginner friendly and are perfect for using up leftover yarn. They can easily be made up in under an hour and also make a great hostess gift. Please enjoy both the free pattern and video tutorial below!
Supplies Needed:
Super Bulk Weight Yarn - Wool Ease Thick and Quick by Lion Brand - 1 ball used here
9.0 mm crochet hook
Cinnamon stick
Craft stuffing and / or yarn ends
Scissors
Tapestry Needle
Measuring Tape
Glue gun - optional
Required Crochet Stitches:
chain (ch)
slip stitch (sl st)
half double crochet
Note: All terms are U.S.
Measurements / Sizing:
Flat pumpkin, prior to seaming and stuffing, measures 7.5" x 13"
Finished pumpkin (Burgandy and Cream):- 5” h x 20” around (approx.)
Black pumpkin: Start with Ch 12 and work13 rows
To adjust to any other size: Start with desired ch. This represents the height of the pumpkin when flat. Work roughly 1-2 rows more the number of chains, depending how plump you want your pumpkin. Be sure to end on an odd row.
Pattern Instructions:
Start with long tail
Ch 16,
Row 1: Hdc in 2nd ch and across (15) ch 1, turn
Rows 2 - 17: Hdc in the back loop only across.
Finishing:
Don’t turn. Fold in half from bottom up. Ch 1, turn. Slip stitch loops closest together across and fasten off. With tail weave all around the bottom and cinch tightly and secure with a knot. Trim end.
Stuff your pumpkin to desired shape.
Close the top using the same method as the bottom, leaving a small opening to insert stem. Once stem is positioned, insert yarn tail all the way through to the bottom very tightly in order to shape the top of the pumpkin. Secure with a knot and trim end.