Showing posts with label yarn. Show all posts

Super Scarf :: Free Pattern

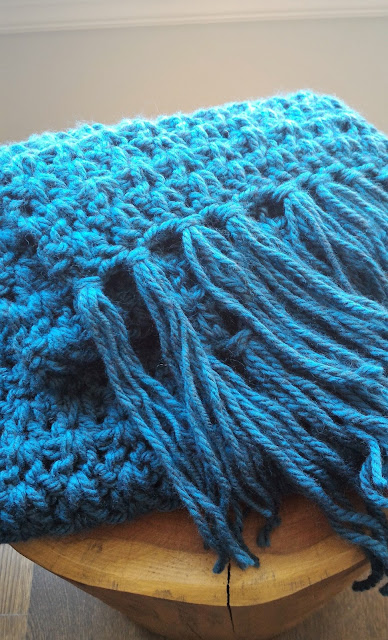
Hello Friends...Super Scarves are all the rage. Here's a quick and easy pattern to whip up in your favorite bulky yarn.



Supplies Needed:

Any Super Bulky Yarn of your choice.  I used a yarn that was manufacturers ends, so I'm not certain the total yardage I wound up using in the end. My best guess would be roughly 4 to 5 balls of something like Bernat Softee Chunky. Buy enough and return what you don't use.

Size 8mm crochet hook

Needle to weave in ends
Yarn scissors

Required Crochet Stitches and Abbreviations:

● Chain (ch)
● Double Crochet (dc)
● Stitch (st)
● Repeat from * to *
● Note: All crochet terms are U.S.

Measurements: 66" without fringe and 82" with fringe in length.  The width is 10". The pattern can easily be adapted to any size you wish. If you prefer a longer or shorter scarf simply repeat rows until desired length is reached. If you wish to change the width, increase or decrease chain in multiples of 2.

Pattern:

Chain 24,

Row 1 - 1 dc into 4th chain from hook,  *Skip 1 stitch, 2 dc into next stitch.  Repeat * until end. 1 dc in the final chain.

Row 2 - Ch 3, skip the next dc and dc twice into the space between the next group of 2. * Dc twice in each space between the groups of 2 from the row below. Repeat * until the end. 1 dc in the final stitch.

Repeat Row 2 until you've reached desired length for your scarf.

Finishing:


Cut several strips of yarn that measure approx. 18" in length each. Take 3 strips, line them up with

each other evenly and fold them in half together. Insert crochet hook into open space at end of scarf.  Loop folded strips over hook.  Pull through space and wrap once around hook.  Pull all the way through and tighten knot.  Repeat evenly across on both ends of scarf.


Please kindly use this pattern for personal use only.  Please do not distribute with out my consent.  Pining of images are welcome, otherwise all images are copyright and may not be used without consent.  Thank you -- Alison, Modern Grace Design


Next Project

Hello Friends...Just playing around with some ideas for my next crochet project and thought I'd share.  I'm loving the chunky yarn lately.

Catching Up

Hello Friends...it's been a very busy few weeks, with the start of school, programs for the kids and our basement repair after the flood over the summer.  We are almost finished (yeah) and just need to put things back in place.  I've also managed to work on a scarf pattern using the gorgeous yarn I purchased in the summer when we visited the Purl Bee Soho.  Take a look:


If you're interested please visit my Etsy Shop for the pattern.


Yarn Storage

Hello Friends...Like may of us yarn crafters out there we see seem to build abundance of yarn time over.  If you're anything like me, you're always struggling with how to store said yarn.  Lately I've been loving the freshness of white.  One day last week I was rummaging around in the garage and came across a rather large white planter that was not being used for much of anything.  So, I did this with it:


Why not make it look pretty, I say.  However, now I may be less motivated to bust through my stash.


Spiked Dishcloths

Hello friends...check out these super fun and funky "spiked dishcloths"...my latest creation.  They are super easy to make and loads of fun, especially when done in bright colours:


Large Shell Doily

Hello friends...I came across this really pretty shell doily on Ravelry called the Gemstone Doily, by Foothills of the Great Smoky Mountains.  I liked that it uses worsted weight yarn, giving it that not so dainty appeal...


I used some leftover bamboo yarn from another project and made mine larger by adding a few extra rounds and the blue trim.  I had to modify the pattern slightly for the extra rounds to make it lie flat...


I'm pretty pleased with the way it turned out...I plan to use on a round pedestal table that we use in the basement beside the sofa...the table top is a pretty painted blue colour, which peaks through oh so prettily.


And, here we are again on my dining room table...


Granny Fun...


Things have been a little slow going of late on the crochet front...I was out with another cold last week and it's just been a tad busier than usual.  I have, however, slowly been working on a project that involves the good ol' Granny Square.  Don't you just love making grannies...I never seem to tire.  Anyway, here's a sneak peak...hopefully I'll get around to finishing up this project for my little one soon, so I can have a Tah Dah to show:


Crochet Flower Coaster :: Free Pattern


So folks, this is my first attempt at actually writing out a pattern.  I've fooled around in the past with my own creations, never bothering to write anything down, so I thought I'd start with something super simple and super cute.  What could be more simple than a circle with a scalloped border?  Anyway, here you go...please, if you try it out, and it doesn't work, I'd love the feedback, and or corrections!


Supplies for Flower Coaster:
I used some leftover Lion Brand Cotton Ease for this project. You could use any cotton yarn of your choice. Hook size is 4.5 mm for this yarn, but again, go with whatever hook size your yarn specifies. My coasters measure approx. 4.5 inches in diameter; the size is up to you, but I find this to be a nice large size...it suitable for glasses, mugs, hand soap pumps, etc.


Please kindly use this pattern for personal use only.  Please do not distribute with out my consent.  Pining of images are welcome, otherwise all images are copyright and may not be used without consent.  Thank you -- Alison, Modern Grace Design

Pattern Instructions:
  • chain 4, join with a slip stitch to first ch to make a ring
  • ch 1 (counts as first sc), make 5 sc into centre of ring, make a slip stitch to first ch 1 (6 stitches)
  • ch 1, sc into st at base of ch 1, 2 sc in each st around, sl st in ch 1 (12 stitches)
  • ch 1, 2 sc in next st, 1 sc in next; repeat pattern all around ending with 2 sc in last st, sl st in ch 1 (18 stitches)
  • ch 1, sc in next st, 2 sc in next st, sc in next 2 sts, 2 sc in next st, repeat pattern around, sl st in ch 1 (24 sts)
  • ch 1, sc in next 2 sts, 2 sc in next st, sc in next 3 sts, 2 sc in next, repeat pattern around (30 sts), join new colour with a sl st in ch 1 of round
  • ch 1, sc in next 3 sts, 2 sc in next st, sc in next 4, repeat pattern around (you should have 36 in new colour), sl st in ch 1 of new colour
  • Scallop Flower border - in next st, sc, hdc, sc, then st st in next st, repeat pattern around until you finish the circle with 18 scallops, finish with a st into last st


Practice Motifs

Hello Friends...

As I've been cleaning out my house in preparation to move, I came across a load of squares and motifs that I have done up over the past few years.  Looking back, I should have labelled them so I would know where the pattern came from.  They are mostly from the various crochet books I've purchased over the years and some are patterns that I've found online.  I'd mostly used inexpensive yarn that I had purchased for practice and testing out patterns and of course, some leftover yarn from finished projects.  Seeing as I've pretty much put all my projects and ideas on hold until we are settled in the new house, I thought I'd share some of these past efforts:


Little flowers.


More flowers.


I love this flower, I think I used it on one of my pillows.


Motifs.


More squares and motifs.


There you have it...just a selection of samples.  Do you keep all yours, do you label and categorize them?

Crochet Cowl

Hello Friends...

Just wanted to share with everyone this pretty cowl I made as a custom order.  I love this yarn (Red Heart, Light and Lofty), it's so soft and chunky and super quick to work with.  This cowl couldn't be easier to whip up...I simply chained enough stitches to measure appox. 26" and hdc'd my way up until it reached about 8" wide.  I then added two matching buttons for easy closure.  Honestly, total time working on this project was no more than an hour.  What do you think?  A little warm for our coming summer, but will be perfect for the fall...


New Life to an Old Project

Hello Friends...

Do ever get really excited about a new idea or project and then once you get into it, you find it's not turning out how you'd imagined it in your mind? 

Well, a couple of months back, I'd started a simple project, what was to be a table runner, with some yarn that I had kicking around.  The pattern, a simple circle in a square design.  All along the way, I was not happy with the way things were going...I love the design, but the colours were just not working well together as a table runner.  BUT, as a pillow cover, yes!!  Although not finished yet, I've managed to breathe new life into an old idea.   Have a look so far...I'm kinda liking the retro feel of it:


Have you ever changed course with a projcet idea?  I'd love to hear about it.  Hope you have a wonderful weekend!


Craft store run...

Hello out there friends...how was everyone's weekend?  We had some horrible weather here...cold and rainy on Sat., and on Sun., we woke up to SNOW!  The snow didn't hang around all day, but we had everything from snow flurries, to rain, to sun and even hail.


To beat our weather blues, on Sat. we went to the craft store...the girls love browsing all the stuff for kids and I always enjoy browsing the yarn section, of course.  I was intending to pick up one skein of yarn for a project (more on that later), but once I saw all the yarn on sale, I simply couldn't resist a few more skeins of sale yarn!

The girls picked up these cute little paper lanterns...and decorated them with these pretty little felt butterflies:


I picked up some black yarn for a special request, custom order for a family member...I'll be sure to post the final outcome, and perhaps even (dare I say), my first tutorial.
In addition, I couldn't resist this beautiful organic cotton yarn.  They were on clearance, so I was able to snatch them up for $5 off the regular price! There were only 3 left, so naturally, I hoarded all 3 for myself.  Not sure what to make with them, but I was thinking they'd make a nice scarf.  I just love the colours: